Slideshow
![]() This feature allows you to add a slideshow - a presentation of a series of still images - to your webshop. The slideshow is usually the first thing your visitors will notice, thus it is a great opportunity for leaving an impression.
This feature allows you to add a slideshow - a presentation of a series of still images - to your webshop. The slideshow is usually the first thing your visitors will notice, thus it is a great opportunity for leaving an impression.
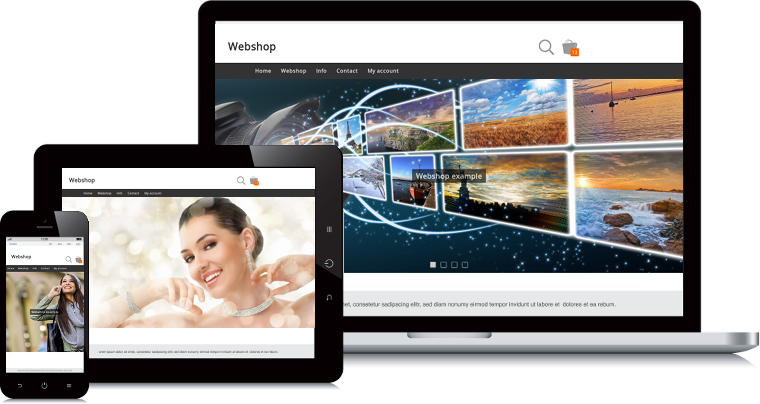
You can use the slideshow on your homepage, category pages and newly added pages. The slideshow is mobile friendly, search engine friendly and multilingual. You can create multiple slideshows, a slideshow can be added to multiple pages and a page can contain multiple slideshows.
Despite all its features, the slideshow is very easy to use. The most important thing to keep in mind is to provide large photos of high quality.
Adding a new slideshow
Navigate to Marketing > Slideshow. When there are no slideshows yet, you will see the new slideshow form. If there are already slideshows, you can add an additional slideshow by choosing Add in the slideshow selection menu.
Next, choose the page and the page location where you want to add the slideshow.
Slideshows can be different for each language, so repeat if your webshop is multilingual. You can change the language in the language selection menu.

You can navigate trough your slideshows using slideshow selection menu.
Adding and editing a slide
Click the New slide button to add a new slide to your slideshow.
Click the Edit icon next to the slide to edit the chosen slide.
- Photo
- The most important part of your slideshow are high quality photos. It is advisable to upload photos as large as possible: this way they will not be blurry if they are stretched. The maximum file size is 25MB, allowed formats are .jpg, .gif and .png. If the photo is too large, it will be proportionally rescaled to 1920x1920 pixels.
You can also choose Insert image. This allows you to choose and buy a stock image. For optimal quality we recommend choosing the largest size when downloading the image. - Text
- The text that will be shown on the slide. Leave this blank for no text.
- Visible
- This option allows you to temporary hide a slide, without having to delete it.
- Hyperlink
- You can have your slide link to a product, a category, an internal page or to an external page. If you choose to link to a product, enter and select the product code. For categories and pages, choose the desired category or page from the selection menu. For an external page, enter the web address. Leave the hyperlink blank if you just want to show the image without a link.
Changing the order of slides
After you added slides, you can move them around by dragging and dropping them with your mouse, or by clicking the up and down arrows.
Editing a slideshow
You can find the form for editing your slideshow below the slide list. Each slideshow can have different settings in each language. We recommend to keep the settings consistent among your slideshows: this way you don't confuse your visitors.
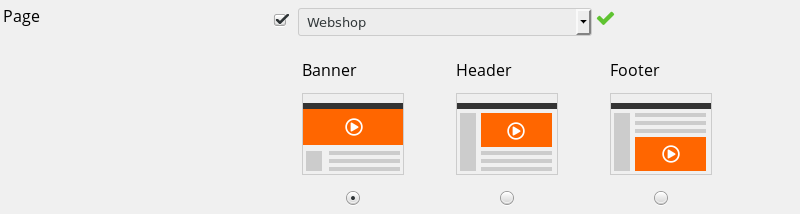
- Page
- Choose the page and the page location where you want to add the slideshow. To add the slideshow on multiple pages, click the Add button.
- Seconds
- Choose the number of seconds you want each slide to be displayed.
- Height
- Choose the height of your slideshow.
- Previous / Next
- Choose if you want to have the previous and next arrows on the edge of each slide displayed. This allows your visitors to navigate to the previous and to the next slide.
- Navigation
- Choose if you want to have navigation squares or circles displayed on the slide. This allows your visitors to navigate to individual slides.
- Progress bar
- Choose if you want to display a progress bar on the bottom of each slide. When the progressbar reached the end, the next slide fades in.
- Text size
- Choose the size of the texts on your slides.
- Text display
- Choose the placement of the texts on your slides.
Slideshow tips and tricks
The slideshow will automatically insert the [WEBSHOP_SLIDESHOW1] keyword on your pages and categories. To gain finer control of the placement of your slideshow, you can move this keyword around. The number in the keyword refers to the number of the slideshow.
Text on your slides will automatically be indexed by search engines. Avoid adding images with text in them: these texts will not be indexed by search engines.
A wide slideshow looks better than a square slideshow. In order to obtain this effect, the photos are sometimes cut at the top and at the bottom. On mobile devices, the slideshow will adapt to the size of the screen. Keep this in mind when placing text directly on your slide images.
Deleting a slide
Click the Delete icon next to the slide to delete the chosen slide.
A deleted slide cannot be recovered.
Deleting a slideshow
To delete a slideshow, simply delete all the slides in your slideshow.
A deleted slideshow cannot be recovered.
Possible Problems
- The slideshow does not appear
- When activating the slideshow module, the keyword [WEBSHOP_SLIDESHOW1] is inserted automatically on the homepage. It is possible you have deleted this keyword. Put the keyword back on the page where you want the slideshow to appear.
- Outdated web browser
- The slideshow does not appear in the outdated Internet Explorer. Unfortunately we can not do anything about this: the slideshow works correctly in all recent web browsers (Edge, Firefox, Chrome and Opera).
Next page: Visitor analysis - Google Analytics
- Introduction
- Product management
- Online store configuration
- Account and shop settings
- Payment methods and Payment Service Providers
- Invoices and Terms & Conditions
- Setting shipping costs
- Discounts and surcharges
- Registering and transferring domain names
- Multilingual shop
- Connecting to external platforms
- Personalized web addresses
- Managing multiple webshops (Multishop)
- Automatic emails to customers
- Designing a beautiful layout
- Order management
- Marketing
- Modules
- Backups and exporting data
- Email and web mail
- Administrator accounts
- High quality photos
- Two-factor authentication
- Labels
- META tags - Website verification
- Live chat
- Slideshow
- Visitor analysis - Google Analytics
- Filters
- Point Of Sale (POS)
- Form fields
- Digital or virtual products
- Symcalia reservation system
- Guestbook
- Contacting the helpdesk