
Categories and subcategories
Overview and structure are important for your online store. Your customers will appreciate it when they quickly find the products they are looking for. Therefore, you can create categories and subcategories to organize your products.
- Click Management > Categories to manage your categories
- Click Add category to create your first category

Adding a new category
Click on the Add category button to create your first category. The first category is always a main (parent) category.
- It is not required to enter the name of the category in all languages, but it is highly recommended
- A photo is not required, but also recommended
The category name is important, as it will be indexed in search engines and used as a web address. Choose a fitting name. Make sure it's not too short so it's easy to click on and also not too long so it doesn't disturb the lay-out of your website.
If your website is multilingual, you can set the category name for each language.
If a category name is not filled in a language, the category will display as Unnamed. There has to be a text: otherwise a visitor can not click on the category link.
Select an image in the Photo field. If you upload photos, all categories will be displayed in boxes. Remove all photos to undo this. Categories without photos appear as text links. We recommend adding photos: this gives your visitors a visual clue of what's behind a category. The photo has to be in the format .jpg, .jpeg, .gif or .png. The maximum file size is 5MB.
Avoid having categories with and without photos. If you choose to have photos, be consistent add a photo to every category.
Try to limit categories to 7 items per level, more navigation items become difficult to navigate on a smartphone screen. Your visitors will not take the effort to search trough a long list.
Category list
New categories are added to the category list.
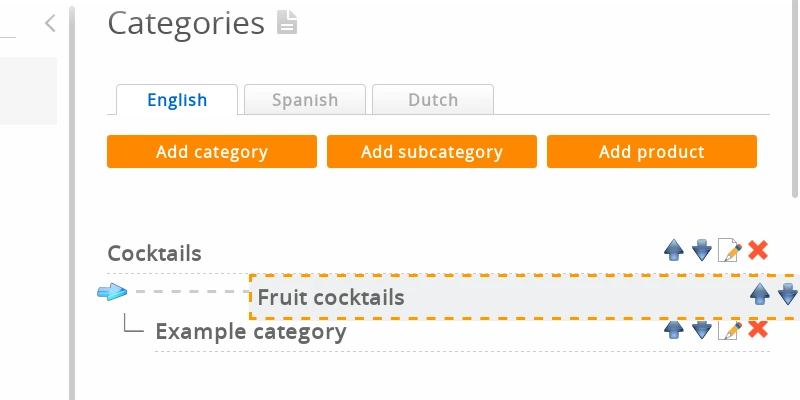
Click this icon to move the category up
You guessed right: this icon moves the category down
Click the Edit icon to update the category
Click the Delete icon to delete a category
Sorting categories
There are two ways for sorting categories.
Method 1
- Use the up and down icons
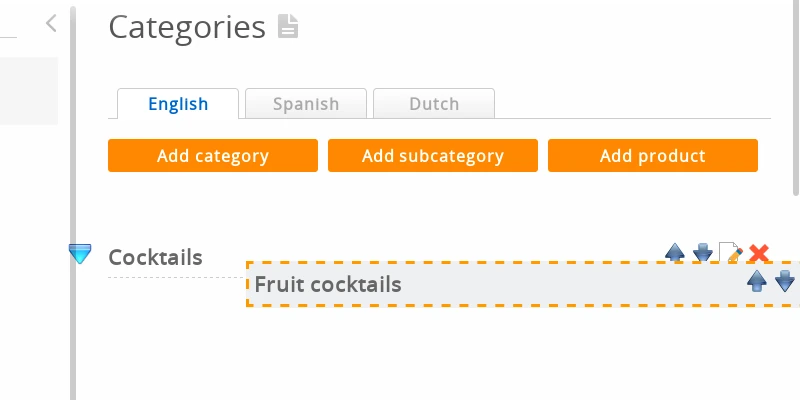
Method 2
- Click and drag a category up or down
- Release the category between two other categories
Saving goes automatically with both methods.
Method 2 doesn't work on a tablet or smartphone. You need a mouse for dragging.
On the bottom of the page you will find a button Sort alphabetically to automatically sort all categories in alphabetical order. Caution: this removes the order in which the categories were previously set.
Subcategories
There are two ways to create subcategories:
Method 1
- Click on the button Add category to create a main category and save
Example: T-shirts - Click on the button Add subcategory to create a subcategory
Example: Adults - Change Main category in the drop down menu to a previous category and save
Example: select the main category "T-shirts"
Method 2
- Click and drag a category up or down
- Release the category upon a different category to make it a subcategory
- Saving goes automagically
Example:
- Category: Hats
- Category: T-shirts
- Subcategory: Adults
- Subcategory: Children
Avoid creating categories more than 3 levels deep. Your visitors should be able to find your products with 3 clicks or less.
Updating photos of a category
You can change the photo of a category by uploading a new image. Please note that some web browsers aggressively cache images, you may not see the result immediately (see the questions and answers below).
Advanced category management
- Click the Edit icon of a category
- You will notice two tabs: Easy and Advanced. Switch to the tab Advanced
Adding a label to the category photo
If labels are active (explained later in this wiki) you can choose which label you want to attach to the category photo. Make sure that the category has a photo, that you have added labels and that the labels module is activated.
Hiding and showing categories
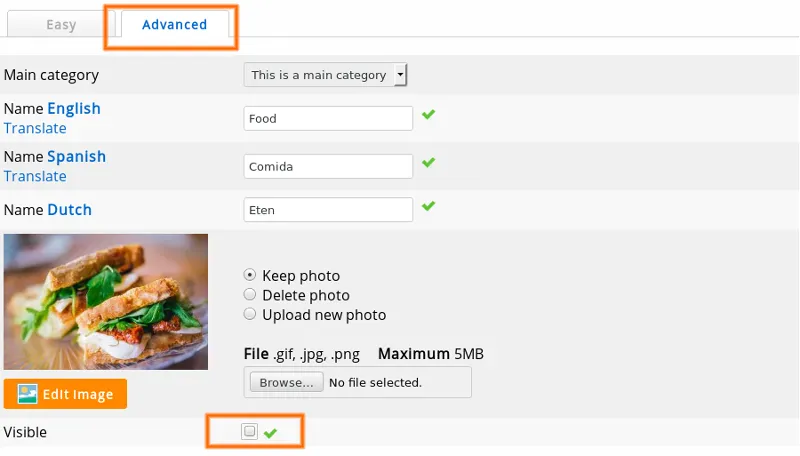
Deactivate the box Visible in order to hide a category.
Adding a category description
Category descriptions provide extra text on the page of the category. This obviously is good for search engine optimization: they love text! The Header is a text above the product list, the Footer comes below.
If your store is multilingual, you can edit the category description in multiple languages by switching the interface language using the link in the top right corner.
Category web addresses
Easy category has its own web page and thus also has a web address (URL). Web addresses for categories are generated automatically for each language based on the category name. You can manually change them in advanced category management.
You can find more information about this topic at personalized web addresses.
Deleting a category
Method 1
Click the Delete icon in the category list to delete a category. When deleting a category, all products that belong to this category will also be deleted.
Method 2
You can also click the Edit icon to edit the category and then scroll down and click the Delete button at the bottom of the page.
Confirmation page
You will see a confirmation page with the name of the category and a list of all the products that will be deleted. To confirm, click the Delete button on the bottom.
Be careful! Deleted categories and their products cannot be restored. Trying to convince our help desk that there was no confirmation page will not get your category and products back if your accidentally deleted them.
Please make back-ups if you want to prevent data loss.
Frequently asked questions about categories
- Why do category photos not change?
- This is usually because the old photos are still in the cache of the web browser. A web browser (Firefox, Google Chrome, ...) saves web pages and images on your hard disk. This way, on your next visit, the page will load faster. When you visit the page, you will see the old version of the photo on your hard drive and not the live version on your website.
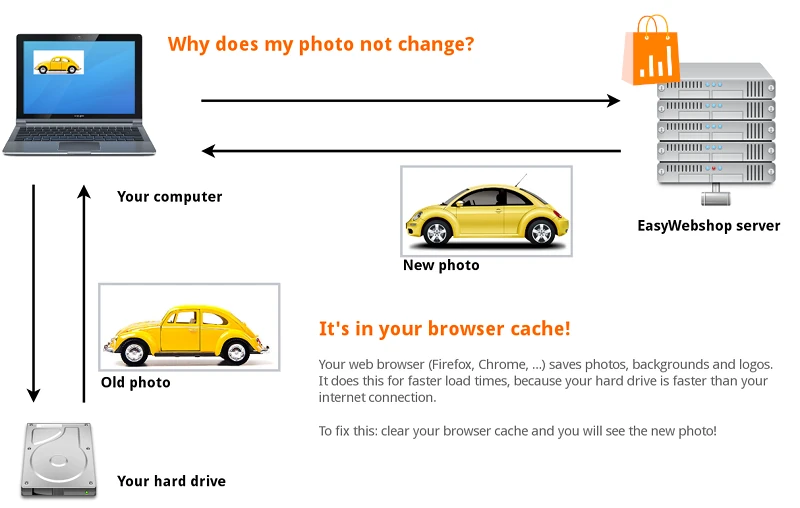
To solve this: navigate to the shop page and click Refresh page or Reload page.
You can also use the shortcut keys: F5 or CTRL + R (Command + R on Mac). The most recent version of the web page is now loaded.
In some web browsers you will have to manually clear the cache in the settings of the web browser. Where to find this depends on the web browser. Consult the help feature of your web browser for this. It's out of the scope of this wiki.
Other possible reasons why you do not see changes:
- You are viewing a wrong website or webpage - It says everywhere "Unnamed"!
- A frequently asked question at our support is why it says Unnamed on the website. The answer is: the category name is not entered in category management in every language.
- Why do one or more categories not show?
- You have hidden the category, that's why its visible in category management but not on the website.
- Why are all my categories gone?
- Probably the color of the text of the categories is set to the same same color of the background of the website. Then it will appear as if the categories are gone. You can fix it by changing the color of the category links or changing the background color.
Next page: Basic product management
- Introduction
- Product management
- Online store configuration
- Account and shop settings
- Payment methods and Payment Service Providers
- Invoices and Terms & Conditions
- Setting shipping costs
- Discounts and surcharges
- Registering and transferring domain names
- Multilingual shop
- Connecting to external platforms
- Personalized web addresses
- Managing multiple webshops (Multishop)
- Automatic emails to customers
- Designing a beautiful layout
- Order management
- Marketing
- Modules
- Backups and exporting data
- Email and web mail
- Administrator accounts
- High quality photos
- Two-factor authentication
- Labels
- Meta tags - Website verification
- Live chat
- Slideshow
- Visitor analysis - Google Analytics
- Filters
- Point Of Sale (POS)
- Form fields
- Digital or virtual products
- Symcalia reservation system
- Guestbook
- Contacting the helpdesk